Full samples source code
Introduction
Before writing NX files, you need to initialise Datakit API.
Parasolid writer is required for NX writer.
See main entry point to see call of Dtk_API::StartAPI function, and Dtk_API::StopAPI. This entry point calls UgWriteSample function.
In this function, we make twice the same tests, one ine version NX5, another with version NX1980. Datakit writer supports to write these versions.
{
std::cout << std::endl << "----------------------------------------------" << std::endl;
std::cout << "Ug Write start" << std::endl;
nxDirectory = inResultDirectory + L"NX-Unigraphics/";
inOutputDirectory = inResultDirectory + L"NX-Unigraphics/nx5/";
inOutputDirectory.
mkdir();
inOutputDirectory = inResultDirectory + L"NX-Unigraphics/nx1980/";
inOutputDirectory.
mkdir();
inOutputDirectory = inResultDirectory + L"NX-Unigraphics/nx2212/";
inOutputDirectory.
mkdir();
std::cout << "Ug Write end" << std::endl;
return errorStatus;
}
The list of available tests of this sample are in function UgWriteSampleVersion
Parts
One Body (1.1)
Let's start with a simple code that will write a NX file containing a cube.
{
std::cout <<
"=> " << inOutputFileName.
c_str() << std::endl;
}
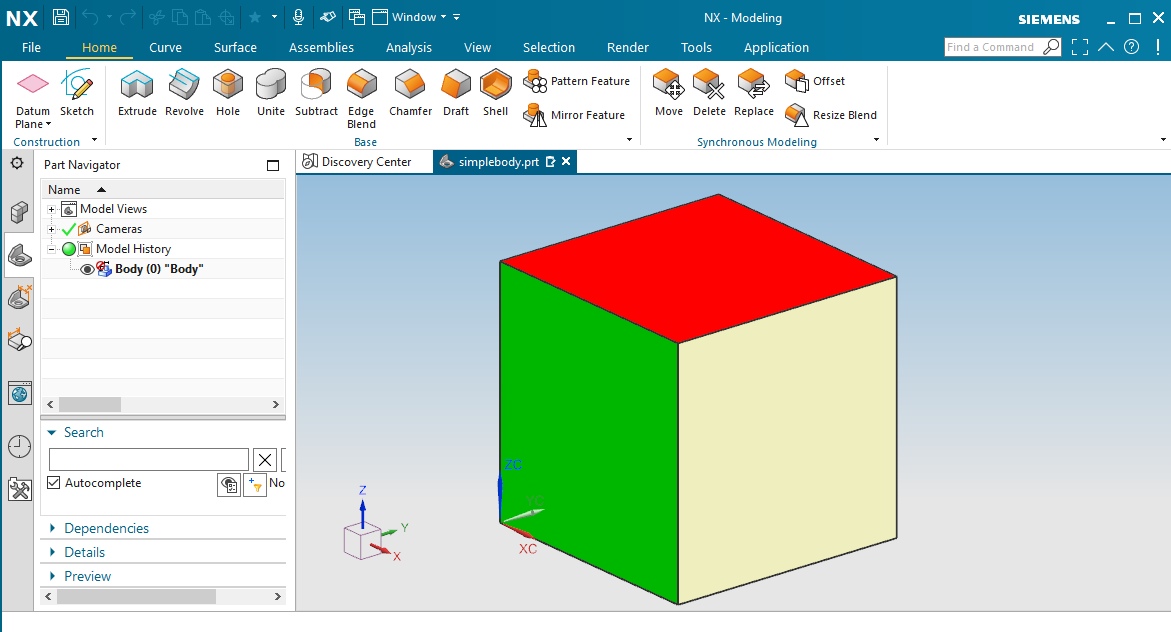
In this example, we get a cube as Dtk_Body (see common exemples)
This cube has some faces colored, these colors are inside the info fields of each face.
Then we initialize the writer with Ugw::InitFile. We provide the name of the file, for example "simplebody.prt", and also the version. The supported versions are DTK_UGW_VERSION_NX5 or DTK_UGW_VERSION_NX1980 Note that version parameter is optional, an default value is DTK_UGW_VERSION_NX5.
We put the cube wth Ugw::WriteBody, then close the writer with Ugw::EndFile.
The macro CHECK_OK just check the return value (a Dtk_ErrorStatus, if an error occurs, it returns the errors aborting the operation).
This sample gives the result below.
Multiple Bodies (1.2)
This example shows how to write more than one bodies, and shows some options.
{
cube1->info()->SetName("FirstCube");
cube2->info()->SetName("SecondCube");
Dtk_transfo translate(
Dtk_dir(1, 0, 0),
Dtk_dir(0, 1, 0),
Dtk_dir(0, 0, 1),
Dtk_pnt(200, 0, 0));
cube2->Transform(translate);
std::cout <<
"=> " << inOutputFileName.
c_str() << std::endl;
}
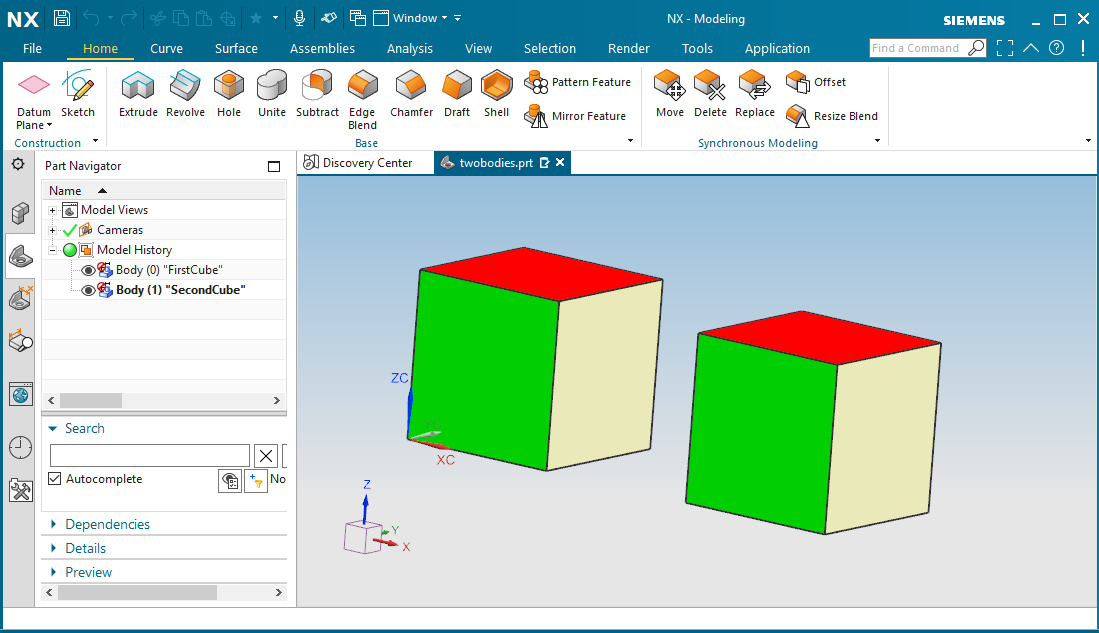
We create two cubes, we apply a transformation on the second with Dtk_transfo translate, then we use two times the function Ugw::WriteBody. You may use this function as many times you want to write more bodies.
We give a name for each cube "FirstCube" and" "SecondCube" in info field of each body. These names appear in part navigator as featurename.
Mesh (1.3)
This example shows how to write a mesh.
{
CubeMesh->info()->SetName("MyMesh");
std::cout <<
"=> " << inOutputFileName.
c_str() << std::endl;
}
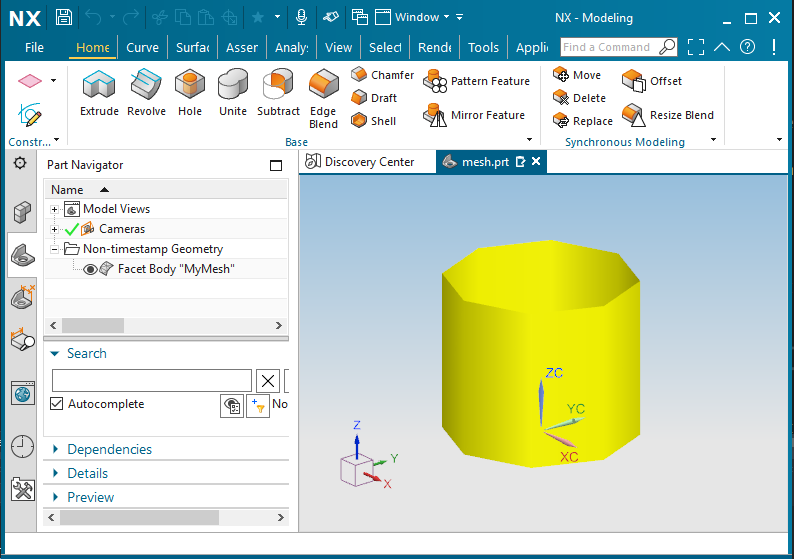
This simple code shows the function Ugw::WriteMesh. We give the name "MyMesh" to the mesh.
Wireframe (1.4)
This example shows how to write wireframe.
{
std::cout <<
"=> " << inOutputFileName.
c_str() << std::endl;
}
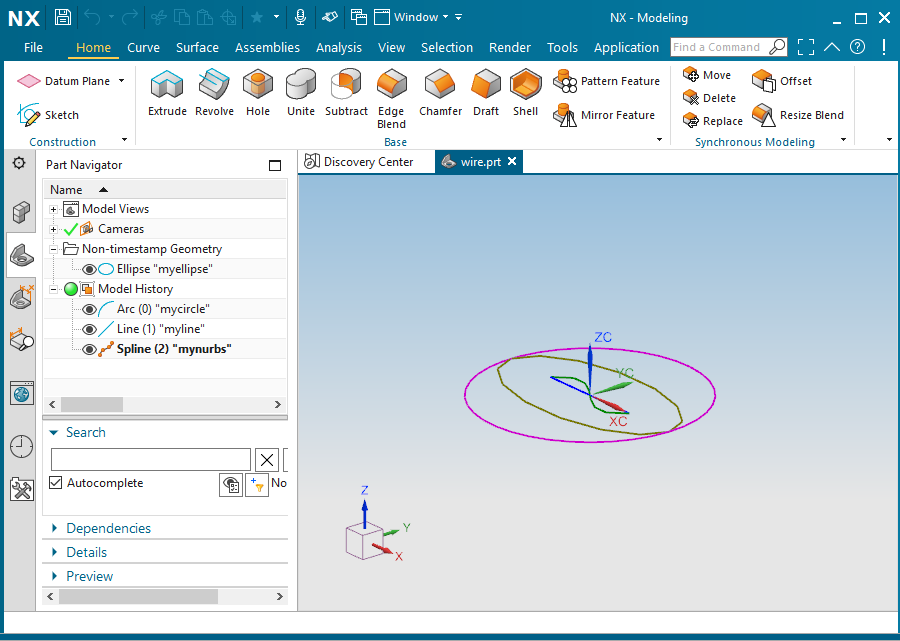
To set wireframe, you need to fill a body with wire entity, then put it inside NX with Ugw::WriteBody With info field of each curve, we can give each feature a name, here "mycircle", "myline". We can also give a color.
Axis systems and references (1.5)
This example shows how to write axis systems, reference planes, references axis, reference points.
{
axis->SetName("MyAxisSystem");
axis->info()->AddAttribute(
"NXNAME",
Dtk_Val(
"ANOTHERAXISSYSTEM"));
axis->info()->SetColor(255, 255, 0);
axis->SetMatrix(axisTransform);
return axis;
}
{
body->info()->SetName("MyReferencePlane");
body->info()->AddAttribute(
"NXNAME",
Dtk_Val(
"MYPLANE"));
body->info()->SetColor(0, 255, 255);
body->AddOpenShell(shell);
return body;
}
{
body->info()->SetName("MyFixedRefPlane");
body->info()->AddAttribute(
"NXNAME",
Dtk_Val(
"ANOTHERFIXEDPLANENAME"));
body->info()->SetColor(0, 0, 255);
body->AddOpenShell(shell);
double trim[] = { -10,10,-10,10 };
plane->SetTrimUVBox(trim);
return body;
}
{
body->info()->SetName("MyRefAxis");
body->info()->AddAttribute(
"NXNAME",
Dtk_Val(
"ANOTHERAXISNAME"));
body->info()->SetColor(0, 255, 0);
body->AddOpenShell(shell);
shell->AddWire(tab);
return body;
}
{
body->info()->SetName("MyRefPoint");
body->info()->SetColor(255, 100, 0);
body->AddOpenShell(shell);
shell->AddWire(tab);
return body;
}
{
cube->info()->SetName("MyCube");
cube->info()->AddAttribute(
"NXNAME",
Dtk_Val(
"SOLIDBODYNAME"));
std::cout <<
"=> " << inOutputFileName.
c_str() << std::endl;
}
Let's see the function UgReferences. We can Ugw::InitFile and Ugw::WriteBody like previous example.
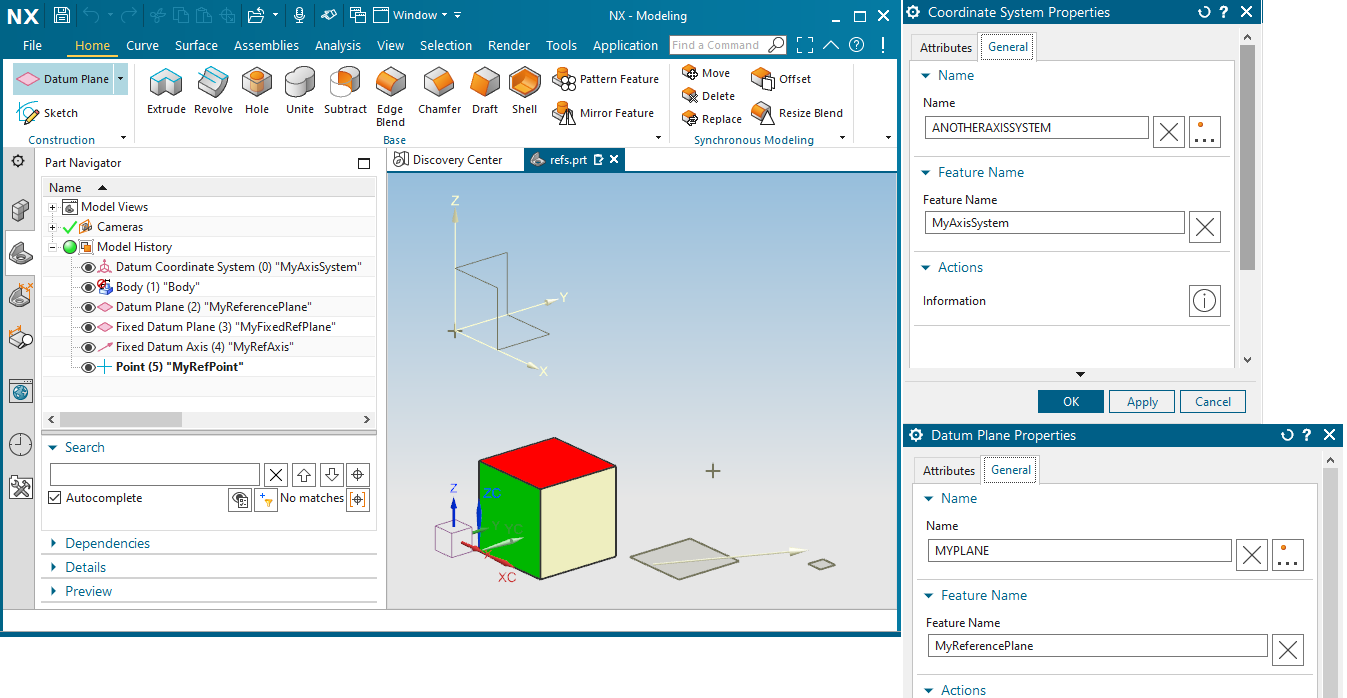
- We add an axis system with Ugw::WriteAxisSystem. In the function MakeAxisSystem we create geometry, giving "MyAxisSystem" as name that will be in part navigator, but we add custom field "NXNAME" to add another name, usually in uppercase, that we see if we ask for properties of the feature, see screenshot.
- We add a reference plane with Ugw::WriteReferenceGeometry. In the function MakeRefPlane, we still use name and NXNAME, we make an untrimmed plane. This will appear in NX as "Datum Plane"
- We add a fixed reference plane with Ugw::WriteReferenceGeometry. The function MakeFixedRefPlane is similar to MakeRefPlane, but we trim the plane, to define bounds. This will appear in NX as "Fixed Datum Plane"
- We add a fixed reference axis with Ugw::WriteReferenceGeometry. The function MakeRefAxis make the geometry, name and NXNAME. This will appear in NX as "Fixed Datum Axis"
We finally a point Ugw::WriteReferenceGeometry. The function MakeRefPoint make the geometry, we give a name, but not NXNAME because NX does not set another name on this feature. This will appear in NX as "Point"
Extern Parasolid file (1.6)
This example shows how to add extern Parasolid file
{
if (!parasolidFile)
{
std::cout <<
"error : " << inParasolidFilePath.
c_str() <<
" does not exist" << std::endl;
}
fseek(parasolidFile, 0, SEEK_END);
flux.
resize(ftell(parasolidFile));
fseek(parasolidFile, 0, SEEK_SET);
fread(&flux[0], 1, flux.
size(), parasolidFile);
fclose(parasolidFile);
std::cout <<
"=> " << inOutputFileName.
c_str() << std::endl;
}
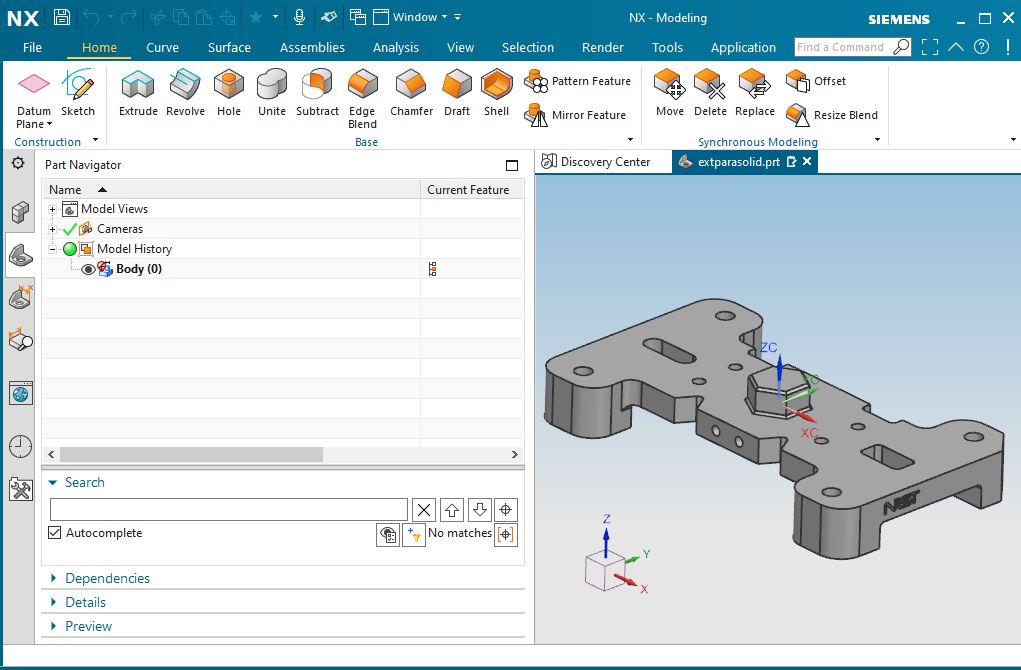
This example add a Parasolid file instead of a Dtk_Body as body. We read the file in memory before giving raw pointer of Parasolid file to function Ugw::WriteExternParasolidBody
Properties
Layer filters (2.1)
This example shows how to make layer filters.
{
Dtk_transfo translatescale(
Dtk_dir(20, 0, 0),
Dtk_dir(0, 20, 0),
Dtk_dir(0, 0, 20),
Dtk_pnt(150, 0, 0));
CylMesh->Transform(translatescale);
CubeBody->info()->SetLayer(5);
CylMesh->info()->SetLayer(6);
std::cout <<
"=> " << inOutputFileName.
c_str() << std::endl;
}
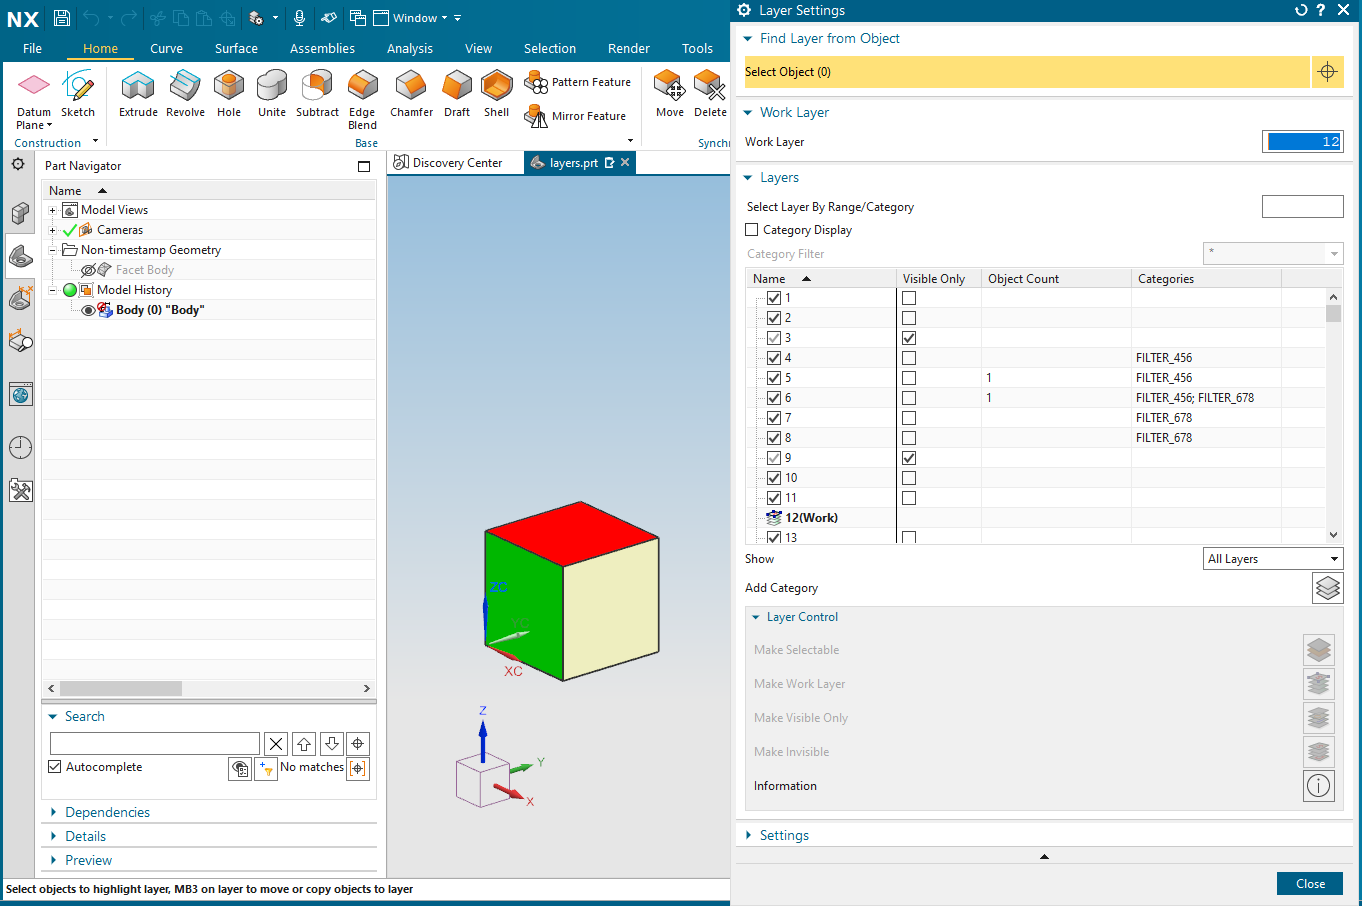
In this sample we use function Ugw::SetLayerData to fill layer datas. NX manage 256 layers (from 1 to 256 included), each of this layer can be invisible, visible only, or visible and selectable. We fill a Dtk_tab of size 257 to define each layer.
The Dtk_LayerInfoSet also contain default layer, and layer filters. In our sample, we make a filter "FILTER_456" contain layers 4,5,6, and "FILTER_678" contain layers 6,7,8
We define default layer as layer 12. We define CubeBody in layer 5, CylMesh in layer 6. Layer 6 is invisible here, so part navigator shows CylMesh as invisible.
We retrieve all these informations on the screenshot below.
Groups (2.2)
This example shows how to make groups.
{
cube1->info()->SetName("FirstCube");
cube2->info()->SetName("SecondCube");
Dtk_transfo translate(
Dtk_dir(1, 0, 0),
Dtk_dir(0, 1, 0),
Dtk_dir(0, 0, 1),
Dtk_pnt(200, 0, 0));
cube2->Transform(translate);
CylMesh->info()->SetName("OneMesh");
Dtk_transfo translatescale(
Dtk_dir(10, 0, 0),
Dtk_dir(0, 10, 0),
Dtk_dir(0, 0, 10),
Dtk_pnt(-100, 0, 0));
CylMesh->Transform(translatescale);
WireBody->Transform(translatescale);
cube1->info()->AddAttribute(
"NXGROUPS",
Dtk_Val(
"GroupRoot\\Sub1\\"));
cube2->info()->AddAttribute(
"NXGROUPS",
Dtk_Val(
"GroupRoot\\Sub1\\\\GroupRoot\\Sub2\\"));
CylMesh->info()->AddAttribute(
"NXGROUPS",
Dtk_Val(
"GroupRoot\\Sub2\\"));
WireBody->info()->AddAttribute(
"NXGROUPS",
Dtk_Val(
"GroupRoot\\Sub2\\"));
std::cout <<
"=> " << inOutputFileName.
c_str() << std::endl;
}
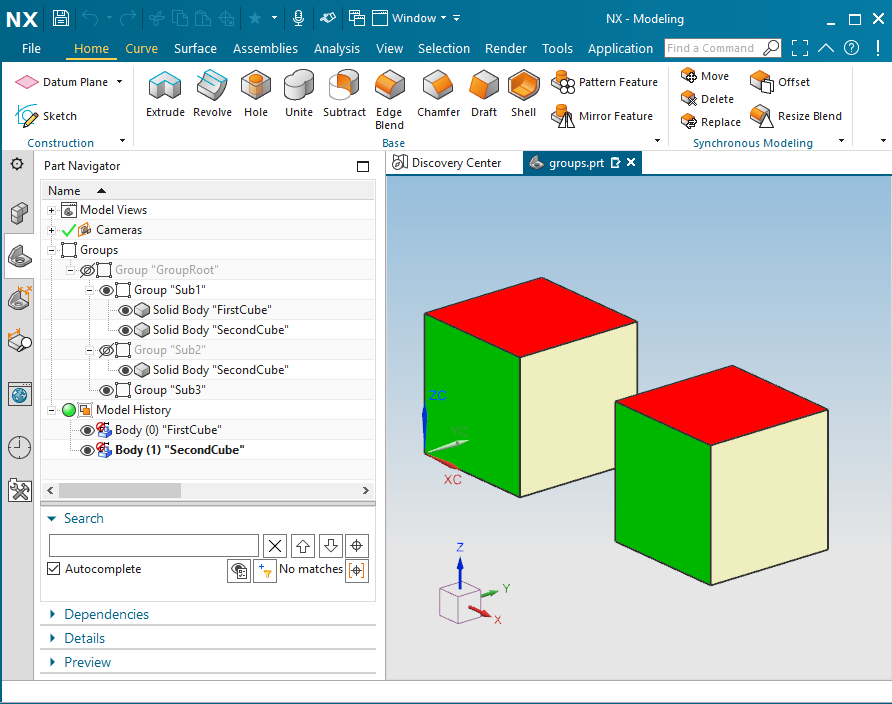
In this example, we make 2 cubes. Filling attribute "NXGROUPS" into info field of each cube, we define cube1 is in group GroupRoot/Sub1, and cube2 is in group GroupRoot/Sub1 ans GroupRoot/Sub2 The groups are a tree, it is possible to make a more complex hierarchy.
We set that group "Sub2" is invisible, and in layer 23 in this sample with Ugw::SetGoupDatas. We also make an empty group, layer 19, still with function Ugw::SetGoupDatas.
Reference Sets (2.3)
This example shows how to make reference sets.
{
cube1->info()->SetName("FirstCube");
cube2->info()->SetName("SecondCube");
Dtk_transfo translate(
Dtk_dir(1, 0, 0),
Dtk_dir(0, 1, 0),
Dtk_dir(0, 0, 1),
Dtk_pnt(200, 0, 0));
cube2->Transform(translate);
cube1->info()->AddAttribute(
"NXREFERENCESET",
Dtk_Val(
"MyRef1\\MyRef2\\MyRef3\\"));
cube2->info()->AddAttribute(
"NXREFERENCESET",
Dtk_Val(
"MyRef1\\MyRef3\\"));
std::cout <<
"=> " << inOutputFileName.
c_str() << std::endl;
}
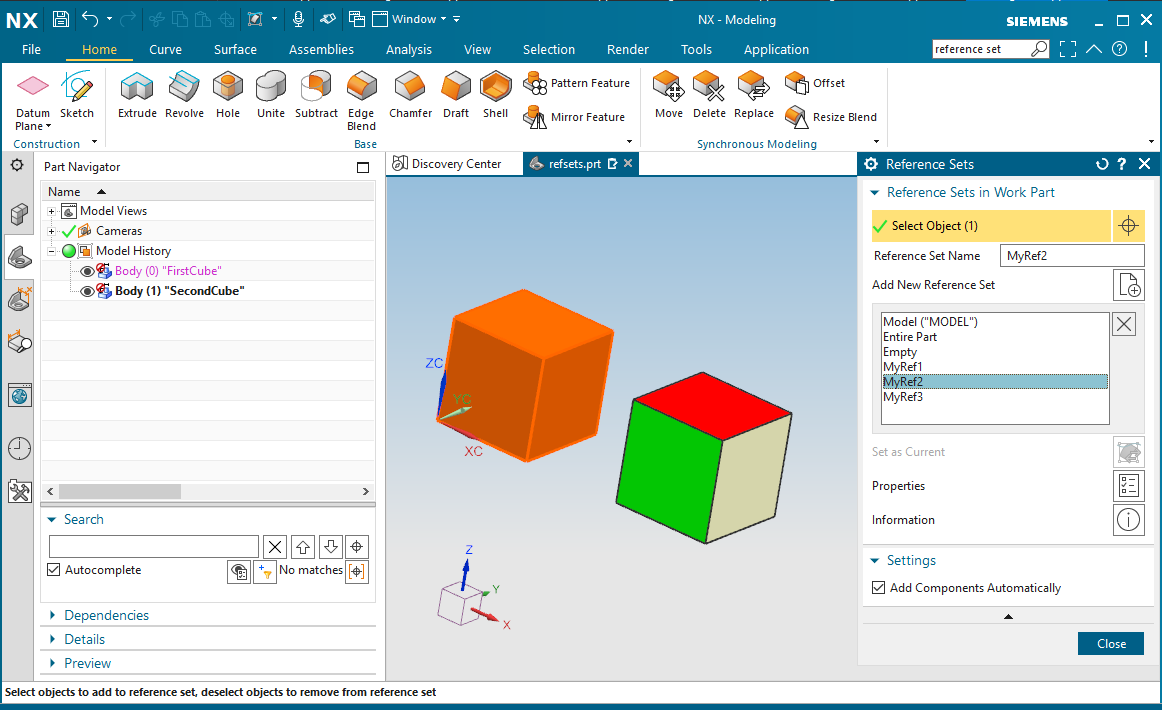
We use custom attribute "NXREFERENCESET" in a body (or a mesh, or other feature) to include it in some reference sets. Here, Cube1 into reference set "MyRef1","MyRef2","MyRef3", Cube2 into reference set "MyRef1","MyRef3".
Preferences and metadatas (2.4)
This example shows how to set default parameters and metadatas
{
meta->SetCategory(inCategory);
return meta;
}
{
def.
unit = Ugw::DefaultParameters::Unit::inch;
std::cout <<
"=> " << inOutputFileName.
c_str() << std::endl;
}
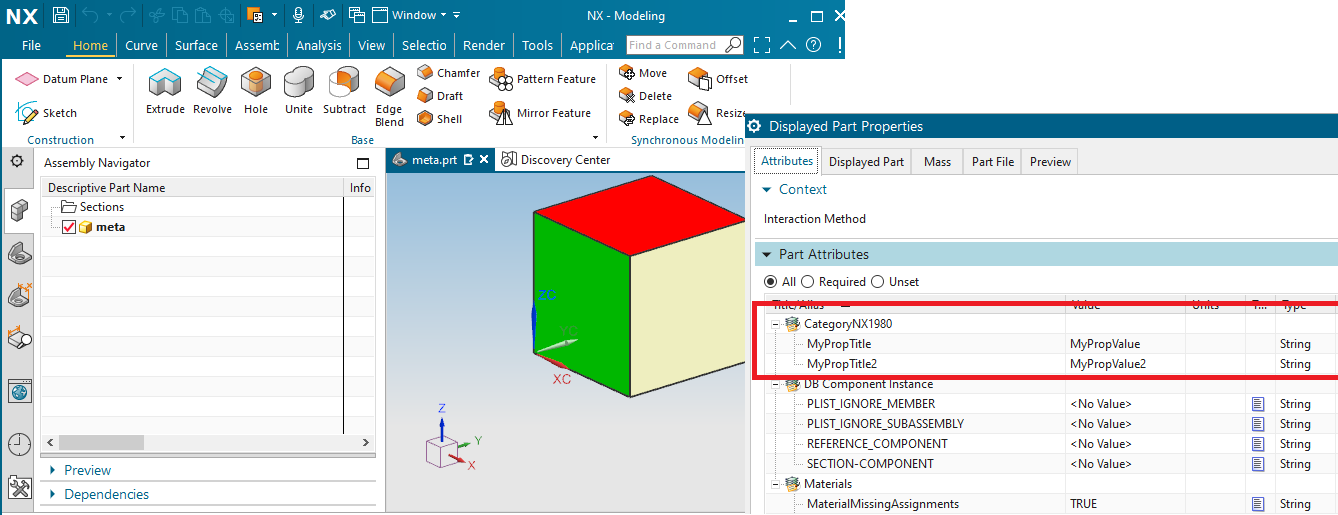
In this example, we will set metadatas, and setup default configurations. About metadatas, check Ugw::AddMetaData, we retrieve it in display part properties, attributes. Note that category is not supported in NX_5 output, but in later vesions.
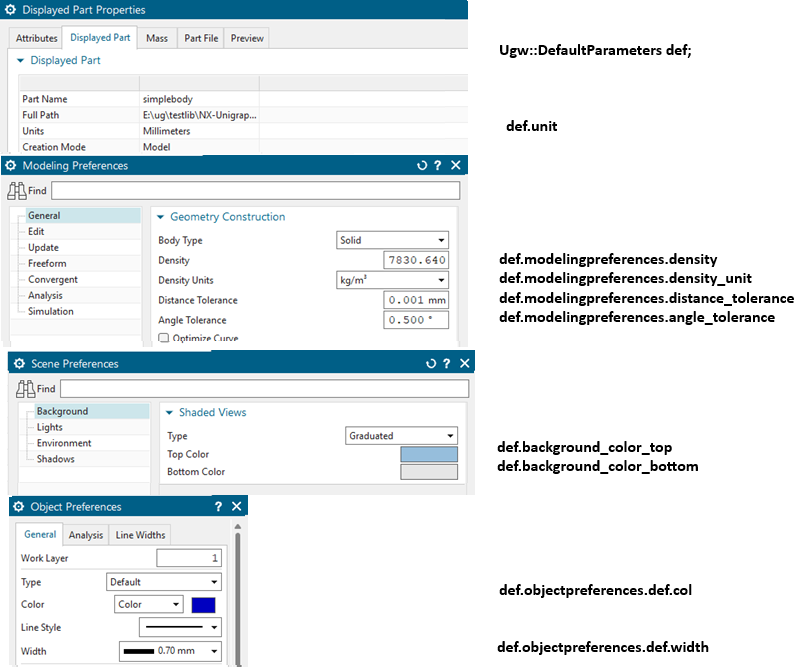
About default configuration, an optional structure Ugw::DefaultParameters can be send to function Ugw::InitFile Here are supported default parameters. On the left where the data is into NX, on the right where is the field of structure Ugw::DefaultParameters
Colors (2.5)
This example shows how to customize colors
{
for (int colorIdx = 0; colorIdx < 217; colorIdx++)
{
}
std::cout <<
"=> " << inOutputFileName.
c_str() << std::endl;
}
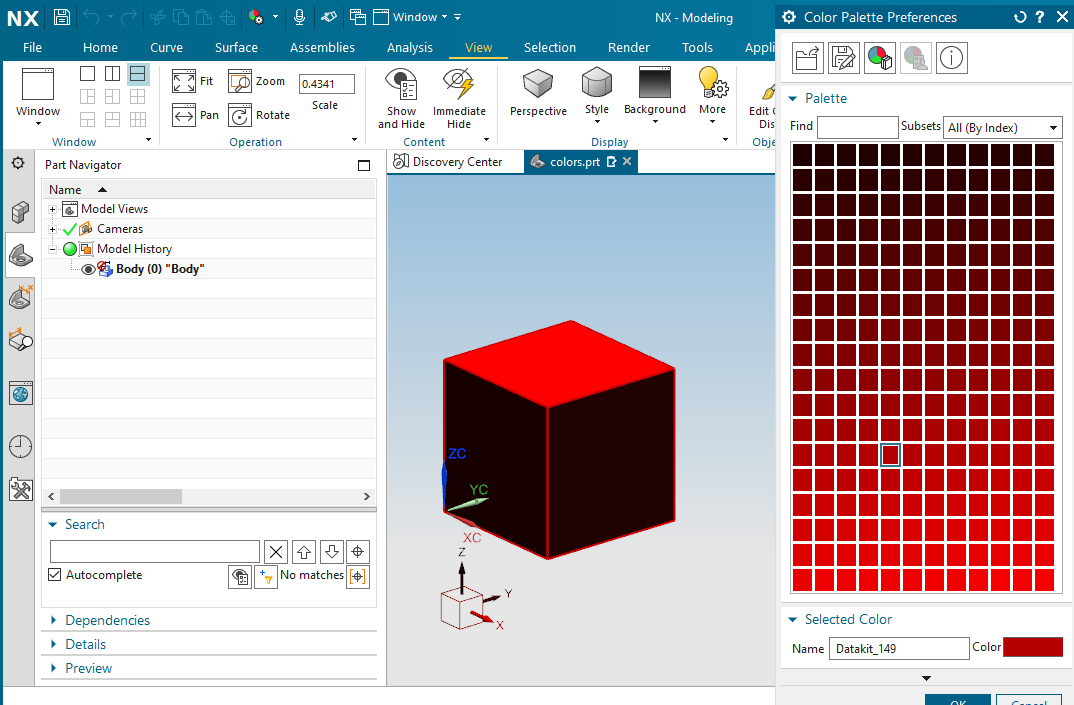
NX stores a palette color. (A palette color per part). There is 217 colors available. Each color can be redefined with RGB value, and a name. Function Ugw::SetColorInTable can set custom colors. Function Ugw::GetColorInTable exists too to retrieve colors.
Note : in default mode, our writer try to find the closer color in existing palette, that's why the cube appears red.
Assemblies
Simple assembly (3.1)
This example shows how to make an simple assembly
{
if (!inVisible)
if (inLayer != -1)
return infos;
}
{
std::cout <<
"=> " << inOutputFileName.
c_str() << std::endl;
}
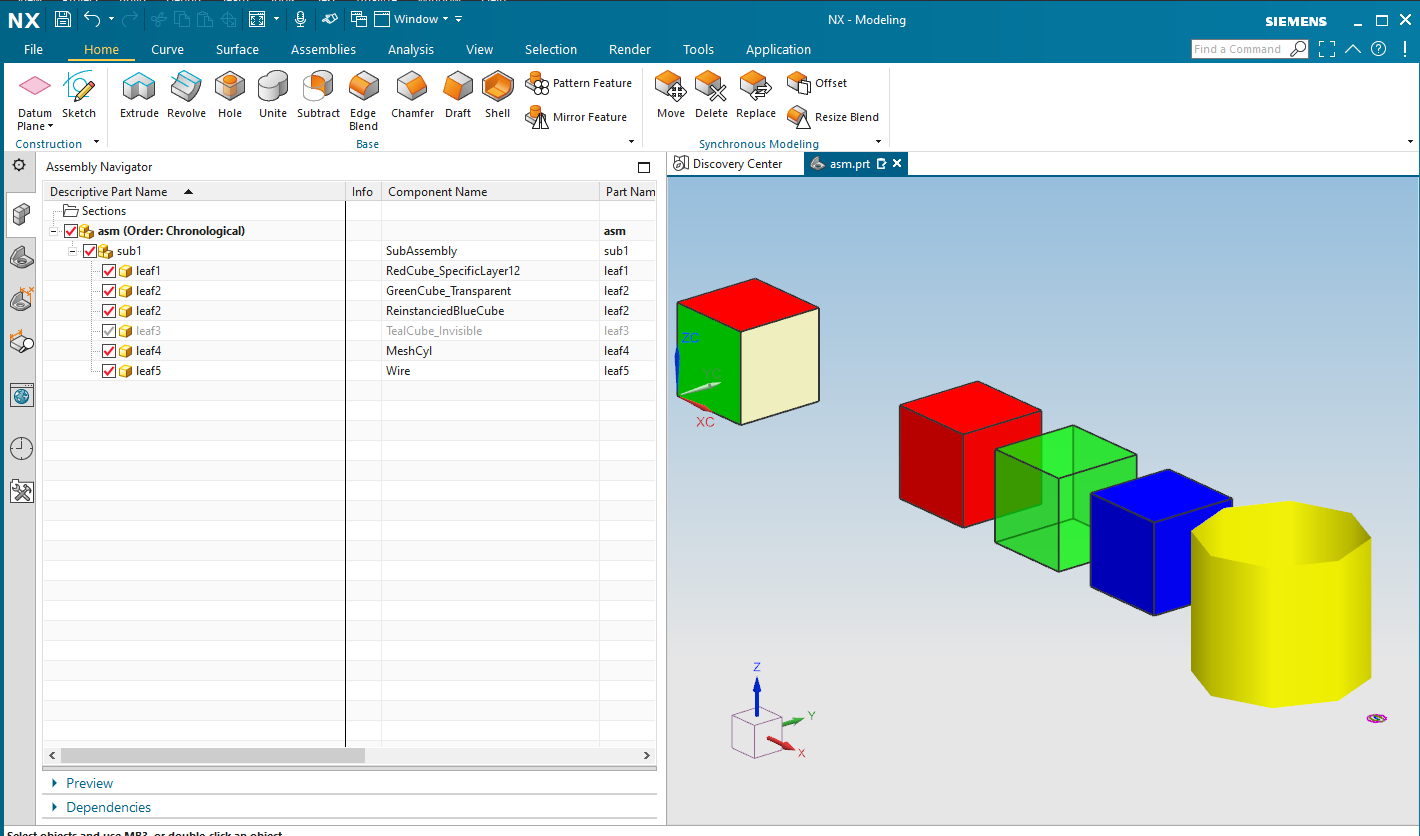
To create open a subassembly, use function Ugw::OpenInstance. We give a name, that will be the file name (without .prt), then a placement matrix (cubetransfo here) And some properties as Dtk_InfoPtr given by MakeInstanceData.
- Instance name using info::SetName()
- Instance color (may contain transparency, like in "leaf2"
- Visibility ("leaf3" is invisible)
- layer : "leaf1" is into layer 12
Note that we reinstanciate leaf2 twice, with different matrix, colors, and visibility. To reinstanciate an existing subassembly, call Ugw::OpenInstance with a part name already used previously, the call Ugw::CloseLastInstance immediatly.
Note that not only leaves can have bodies, see the line "put a cube on the subassembly".
Extern assembly (3.2)
This example shows how to make an assembly from existing files.
#ifdef USE_NX_READER
extern void nxreader_GetData(
const Dtk_string&,
void*&);
#define NX_RETRIEVE_ASSEMBLYDATA nxreader_GetData
#else
#define NX_RETRIEVE_ASSEMBLYDATA NULL
#endif
{
std::cout <<
"=> " << inOutputFileName.
c_str() << std::endl;
}
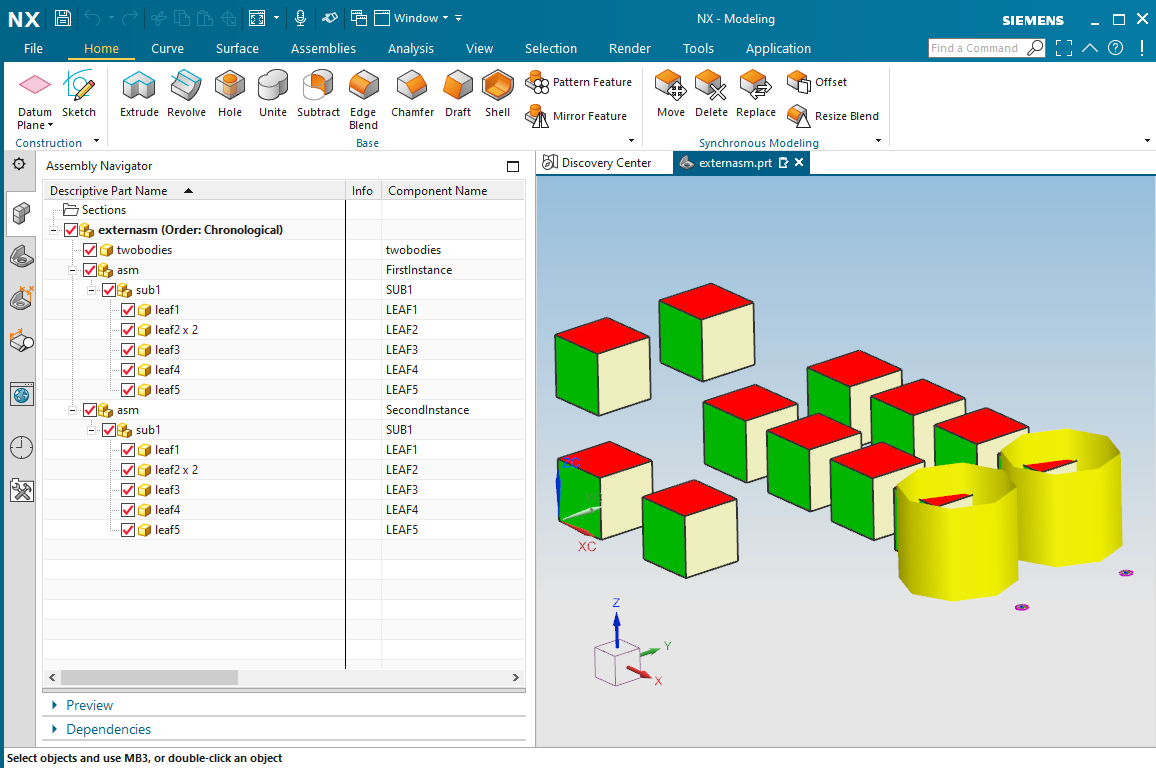
The function Ugw::AddExternInstance adds an existing part or assembly. As a new instance the Dtk_InfoPtr works like the Dtk_InfoPtr of function Ugw::OpenInstance.
About the last parameter, in a normal NX assembly, the root files knows all its hierarchy, not only its children, but grand children, all tree, all leaves, even deep leaves.
Including an assembly with Ugw::AddExternInstance, and NULL at last parameter make the root file (here externasm.prt) knowing only its child (asm.prt) but not the leaves. If we want externasm.prt to know all its leaves, we need to link the Datakit NX Reader, then activate USE_NX_READER, it will link the function pointer nxreader_GetData that will retrieve all datas needed from external assembly.
PMI
Annotation (4.1)
This example shows how to make an annotation
{
symb->Texts() = compotext;
double arrowlength = 5.5;
leader->GetInfo()->SetColor(
Dtk_RGB(0, 0, 255));
leader->GetInfo()->SetCurveThickNessInMM(0.7);
leader->GetInfo()->AddAttribute("NX_TextToLineGap", 10.0);
leader->GetInfo()->AddAttribute("NX_TextOverStubFactor", 0.1);
leader->GetInfo()->AddAttribute("NX_StubLength", 20.0);
leader->GetInfo()->AddAttribute("NX_StubSide", 1);
leader->GetInfo()->AddAttribute("NX_TextAlignment", 1);
leader->GetArrowHead().GetInfo()->AddAttribute("NX_ArrowAngle", 30.0);
leader->GetArrowHead().GetInfo()->AddAttribute("NX_DotDiameter", 1.5);
leader->GetArrowHead().GetInfo()->SetColor(
Dtk_RGB(255, 0, 255));
leader->GetArrowHead().GetInfo()->SetCurveThickNessInMM(2.0);
leader->GetArrowHead().GetInfo()->SetCurveLineType(
DTK_SOLIDLINE);
symb->AddLeader(leader);
pmi->info()->SetName("MyAnnot");
return pmi;
}
{
std::cout <<
"=> " << inOutputFileName.
c_str() << std::endl;
}
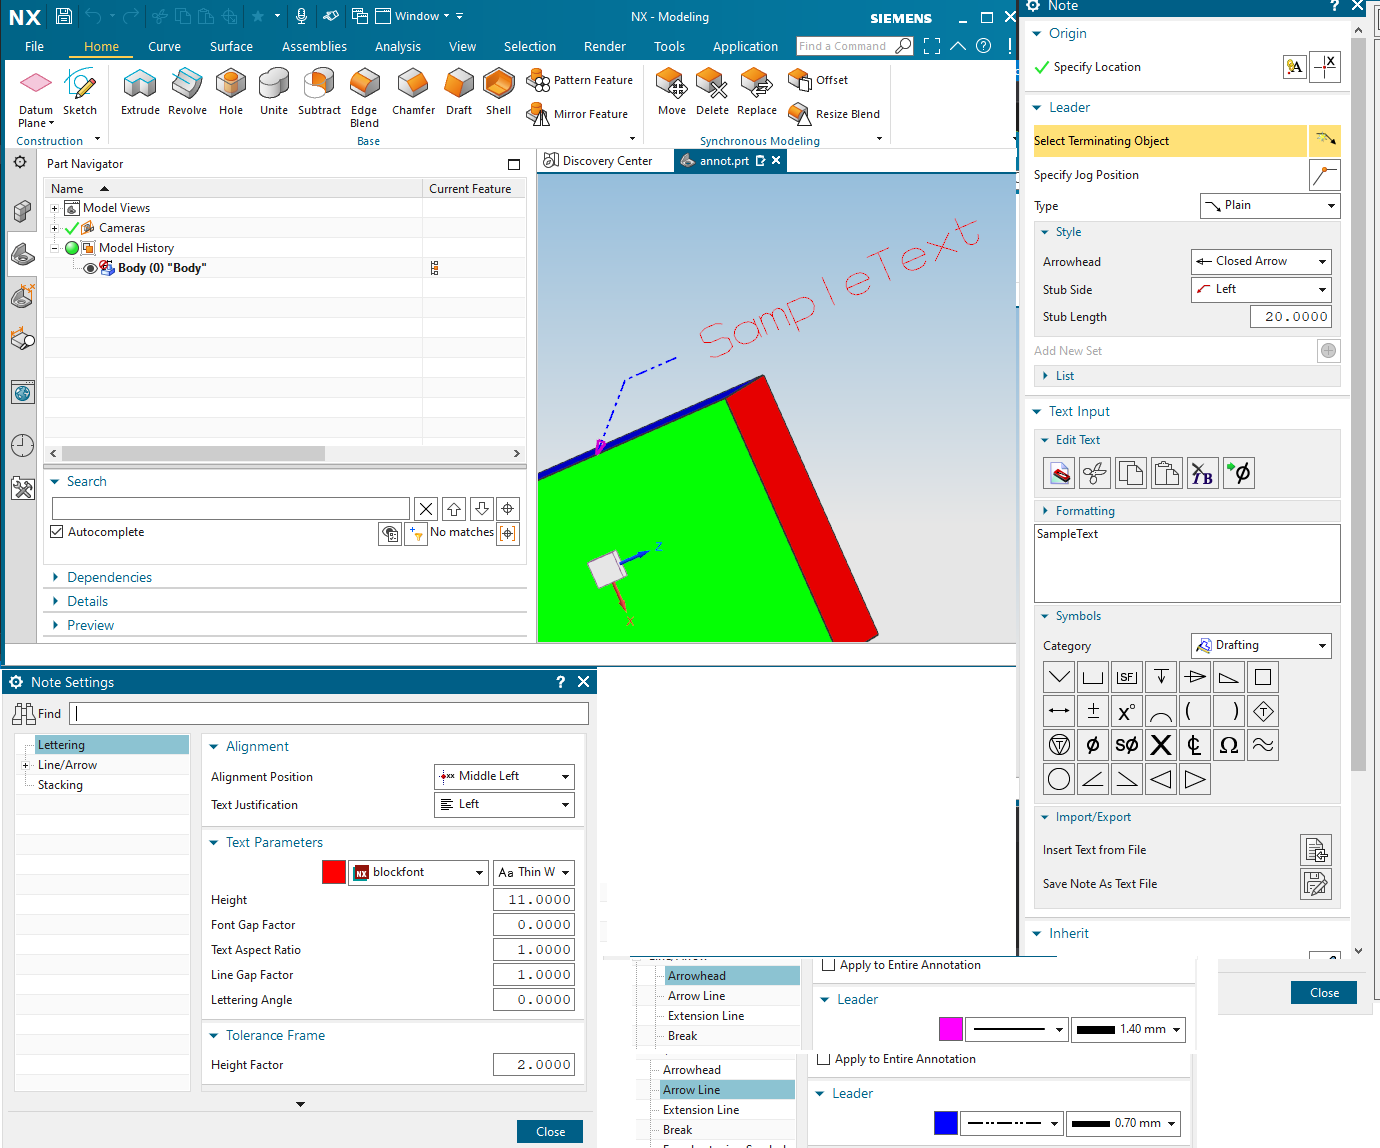
In this example, we create a simple Annotation. The function UGW_Sample_MakePMI shows differents options you retrieve on the screenshot.
Actually, annotation creation is limited as :
- one text
one arrow with one stub